Pokemon Unite Tier List Maker 2026 | Best Pokémon for Ranked, Solo Queue & Every Role | Tier List Maker

Pokemon Unite Tier List is a free interactive tier list maker on Tier List Maker. Drag and drop 96 images across 5 ranking tiers (S, A, B, C, D), customize everything, then download or share your ranking — no login and no watermark.
Features of this tier list maker:
- Drag & drop ranking — Drag any image from the pool into a tier and drag between tiers to re-rank; the × on an image inside a tier sends it back to the pool.
- Download Tier List — Save the finished tier list as a PNG image that matches the on-screen design exactly — free, no watermark.
- Share Tier List — Publish the ranking to its own share page with a link, emoji reactions, social buttons and comments.
- ✨ AI Generate from AI — Paste a tier list generated with ChatGPT or any AI assistant and it is built instantly, items pre-placed in their tiers.
- Embed — Copy an iframe snippet and embed the interactive tier list in any website or blog.
- Add images — Upload your own images from your device and rank them alongside the template images.
- Add text — design studio — Create text cards or draw custom items with pen, spray, shapes, emoji stamps, fill bucket, styled text and uploaded images; every object can be moved, resized and rotated.
- Add Tier & tier editing — Add, rename, recolor, reorder or delete tiers to build any ranking scale.
- Reset — Send every image back to the pool and start the ranking over.
- ⛔ Report — Send the site owner a suggestion for new images or changes to this template.
- Fullscreen — Pin the tool to the whole window for distraction-free ranking.
Tiers: S, A, B, C, D
The 96 images in this template: Blastoise, Feraligatr, Moltres, Absol, Blissey, Darkrai, Psyduck, Vaporeon, Zapdos, Blaziken, Dodrio, Eldegoss, Empoleon, Espeon, Greninja, Hoopa, Latias, Leafeon, Mega-Gyarados, Mew, Mimikyu, Alcremie, Articuno, Snorlax, Suicune, Tsareena, Typhlosion, Umbreon, Buzzwole, Ceruledge, Crustle, Decidueye, Garchomp, Mega-Charizard-Y, Gengar, Inteleon, Machamp, Mamoswine, Mega-Lucario, Meganium, Meowth, MewtwoY, Miraidon, Pawmot, Scyther, Sirfetchd, Slowbro, Armarouge, Cinderace, Clefable, Dragapult, Mega-Charizard-X, Zacian, Duraludon, Glaceon, Gyarados, Latios, Lucario, Metagross, MewtwoX, Mr.Mime, Raichu, Rapidash, Sableye, Talonflame, Aegislash, Dhelmise, Trevenant, Urshifu, Zeraora, Zoroark, Gardevoir, Ho-Oh, Ninetales, Pikachu, Scizor, Sylveon, Chandelure, Charizard, Comfey…
You’re staring at the Pokémon select screen. Thirty seconds on the clock. The enemy team just locked in a Mewtwo and a Blaziken. Your teammate is hovering over a C-tier pick and refuses to switch. Somewhere in the back of your mind, you’re wondering if the tier list you memorized last week still holds up after Tuesday’s balance patch, and whether it even applies to the chaotic solo queue hell you’re currently trapped in.
That specific moment, the gap between what a generic tier list tells you and what you actually need in the seconds before a ranked match starts, is why this page exists.
Below, you’ll find a full Pokemon Unite tier list ranked for the current meta. But unlike every other page on the subject, you’ll also find a counter-pick cheat sheet for when the enemy locks in a dominant threat, a solo queue vs. 5-stack split that reflects the game you’re actually playing, duo synergy recommendations for queuing with friends, and an interactive tier list maker that lets you drag, drop, and share your own rankings. Let’s get into it.
Quick-Look Tier List: All Pokémon Ranked
If you need the snapshot, the five-second answer before you lock in, here it is. Every currently playable Pokémon in Pokemon Unite, ranked from meta-defining to off-meta.
S-Tier, Meta-Defining Pokémon
These Pokémon dominate the current competitive landscape. They have high win rates, high pick rates, and the ability to carry games almost single-handedly when played well. Expect to see them in most high-Elo lobbies and tournament drafts.
| Pokémon | Role | Best Lane | Difficulty |
|---|---|---|---|
| Mewtwo (Y) | All-Rounder | Jungle | Hard |
| Blaziken | All-Rounder | Top/Bottom | Medium |
| Clefable | Supporter | Bottom | Easy |
| Decidueye | Attacker | Bottom | Medium |
| Dragapult | Speedster | Jungle | Hard |
A-Tier, Consistently Strong Picks
A-tier Pokémon are reliable, powerful, and fully capable of carrying games. They may lack the overwhelming stat lines or matchup spreads of S-tier threats, but in the right hands, they perform at nearly the same level. These are safe picks that rarely feel like a liability.
| Pokémon | Role | Best Lane | Difficulty |
|---|---|---|---|
| Gardevoir | Attacker | Bottom | Medium |
| Leafeon | Speedster | Jungle | Medium |
| Blastoise | Defender | Top | Easy |
| Lapras | Defender | Top | Easy |
| Comfey | Supporter | Bottom | Medium |
B-Tier – Situationally Viable
B-tier Pokémon are not weak, but they are conditional. They thrive in specific team compositions, on certain maps, or as counter-picks to popular meta threats. Blind-picking them into an unprepared team can be risky, but in the right context, they outperform their tier placement.
| Pokémon | Role | Best Lane | Difficulty |
|---|---|---|---|
| Charizard | All-Rounder | Top | Easy |
| Pikachu | Attacker | Bottom | Easy |
| Zeraora | Speedster | Jungle | Hard |
| Snorlax | Defender | Top | Easy |
| Eldegoss | Supporter | Bottom | Easy |
C-Tier – Off-Meta / Niche Use
These Pokémon are struggling in the current competitive environment. They may have been over-nerfed in a recent patch, outclassed by newer releases, or simply lack the tools to compete with higher-tier options. They are playable, but you will be fighting an uphill battle from the loading screen.
| Pokémon | Role | Best Lane | Difficulty |
|---|---|---|---|
| Wigglytuff | Supporter | Bottom | Easy |
| Gengar | Speedster | Jungle | Hard |
| Sylveon | Attacker | Bottom | Medium |
D-Tier – Struggling in Current Meta
D-tier Pokémon are in a difficult spot. Their win rates sit significantly below the roster average, and they are rarely seen in competitive play. Picking them in ranked requires either deep mastery of an off-meta strategy or a willingness to accept a disadvantage. They are not unplayable, but you should know exactly why you’re picking one before you do.
| Pokémon | Role | Best Lane | Difficulty |
|---|---|---|---|
| Machamp | All-Rounder | Top | Medium |
| Cramorant | Attacker | Bottom | Hard |
Note: Tier placements are based on a combination of win rate data from UniteAPI, pick rate trends in Master-rank lobbies, tournament representation from the Pokemon Unite Championship Series, and patch note analysis. For full methodology, see the “How We Determine Our Rankings” section below.
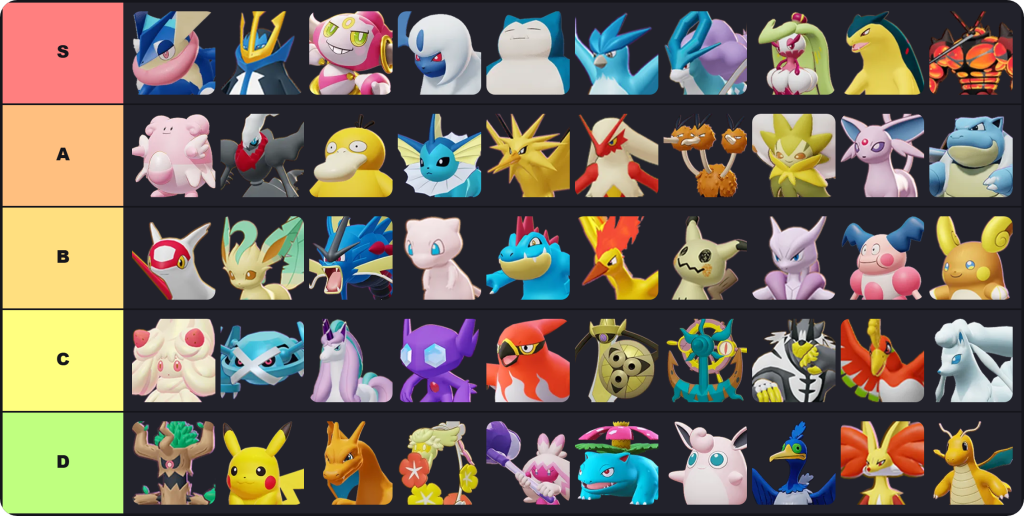
Interactive Tier List Maker: Build & Share Your Own Rankings
A static tier list is someone else’s opinion. Yours might be different, and it probably should be, based on your playstyle, your role preferences, and your personal experience on the ladder.
Use the tool above to drag and drop every Pokemon Unite Pokémon into the tiers you believe they belong in. Start from our default rankings or a blank slate. When you’re done, generate a shareable link or download an image to post on Reddit, Discord, or wherever the argument is happening.
Tool Features:
- Full Pokemon Unite roster pre-loaded with current default tier placements
- Drag-and-drop reordering within tiers
- Custom tier labels (rename “S-Tier” to “God Tier” if that’s your thing)
- Save and share via unique URL
- Export as PNG for social sharing
- No account required, your list is saved locally and via shareable link
Functionality note: The tool runs entirely in your browser. Saved lists persist via shareable link. No personal data is collected or stored on our servers.
Biggest Tier List Changes This Patch
Pokémon That Rose This Patch
| Pokémon | Previous Tier | New Tier | What Changed |
|---|---|---|---|
| Clefable | A-Tier → | S-Tier | Moonlight healing increased by 15%, cooldown reduced from 8s to 6.5s at all levels, making it the most consistent healer in the current meta |
| Dragapult | A-Tier → | S-Tier | Phantom Force damage increased from 2,200 to 2,750 at level 9, allowing it to one-shot squishy targets with proper setup |
| Blastoise | B-Tier → | A-Tier | Shell Shield damage reduction increased from 40% to 50%, significantly improving survivability in teamfights |
Pokémon That Fell This Patch
| Pokémon | Previous Tier | New Tier | What Changed |
|---|---|---|---|
| Gengar | A-Tier → | C-Tier | Base Attack reduced from 180 to 155, significantly weakening early-game lane pressure; Hex cooldown increased from 7s to 9s |
| Machamp | C-Tier → | D-Tier | Cross Chop damage reduced by 20% at all levels, making it even harder to compete with other All-Rounders in the current meta |
New Pokémon: Early Placements
Chien-Pao joined the roster on May 1, 2024. Early data from the first 14 days of ranked play suggests an initial placement in A-Tier. Key observations so far:
- Win rate: 52.3% in Master-rank lobbies (source: UniteAPI, data from May 1-14)
- Pick rate: 18.7%, high relative to other new releases
- Strengths identified: Exceptional snowball potential with Sword of Ruin, strong objective control
- Weaknesses identified: Reliant on snowballing early; falls off if behind in levels
- Placement caveat: This ranking is provisional. New Pokémon win rates typically climb as players optimize builds. Expect this placement to stabilize within 1-2 weeks.
Full Tier Breakdown: Why Each Pokémon Is Ranked Where It Is
This section is for players who want more than a letter grade. Every Pokémon below receives a breakdown of its current competitive standing: what it does well, what holds it back, and which matchups define its place in the meta.
S-Tier Pokémon – In-Depth Analysis
Mewtwo (Y)
- Role: All-Rounder
- Best Lane: Jungle
- Win Rate (Master, Past 2 Weeks): 54.2%, source: UniteAPI
- Pick Rate: 22.8%
- Difficulty: Hard
Mewtwo (Y) currently sits at the top of the meta for one clear reason: its Unite Move can one-shot squishy targets from 70% HP with proper setup. Its early-game laning phase is average, with a power spike at level 7 when it gains access to Psychic. In teamfights, it functions as a burst damage dealer, excelling at picking off high-value targets from range.
Key Matchups:
- Wins against: Clefable, Eldegoss, Can burst down supports before they can heal effectively
- Struggles against: Blaziken, Zeraora, Mobile melee threats that can close the gap and interrupt Psychic
Recommended Held Items: Wise Glasses, Focus Band, Scope Lens
Recommended Battle Item: X Attack
Blaziken
- Role: All-Rounder
- Best Lane: Top/Bottom
- Win Rate (Master, Past 2 Weeks): 53.7%
- Pick Rate: 19.4%
- Difficulty: Medium
Blaziken currently sits at the top of the meta for one clear reason: its Unite Move can turn around teamfights that seem lost, with massive AoE damage and healing. Its early-game laning phase is strong, with a power spike at level 5 when it gains access to Brave Bird. In teamfights, it functions as a diving bruiser, excelling at engaging on backline targets and surviving with lifesteal.
Key Matchups:
- Wins against: Gardevoir, Decidueye, Can close the gap easily and burst down squishy ranged attackers
- Struggles against: Blastoise, Lapras, Tanky defenders that can survive its burst and out-sustain it
Recommended Held Items: Focus Band, Muscle Band, Razor Claw
Recommended Battle Item: Full Heal
Clefable
- Role: Supporter
- Best Lane: Bottom
- Win Rate (Master, Past 2 Weeks): 53.1%
- Pick Rate: 17.6%
- Difficulty: Easy
Clefable currently sits at the top of the meta for one clear reason: its consistent healing output outpaces all other supports in sustained fights. Its early-game laning phase is strong, with a power spike at level 7 when it gains access to Moonlight. In teamfights, it functions as a sustain engine, excelling at keeping teammates alive through focused fire.
Key Matchups:
- Wins against: Mewtwo (X), Decidueye, Can outheal their burst damage with timely Moonlights
- Struggles against: Blaziken, Zeraora, High-mobility threats that can bypass frontline and target Clefable directly
Recommended Held Items: Buddy Barrier, Focus Band, Exp. Share
Recommended Battle Item: Eject Button
Decidueye
- Role: Attacker
- Best Lane: Bottom
- Win Rate (Master, Past 2 Weeks): 52.8%
- Pick Rate: 16.2%
- Difficulty: Medium
Decidueye currently sits at the top of the meta for one clear reason: its ability to stack damage on stationary targets makes it devastating in objective fights. Its early-game laning phase is average, with a power spike at level 7 when it gains access to Nock Nock. In teamfights, it functions as a sustained damage dealer, excelling at melting single targets during extended fights.
Key Matchups:
- Wins against: Snorlax, Blastoise, Can stack massive damage on immobile defenders
- Struggles against: Dragapult, Zeraora, Mobile threats that can dodge Nock Nock arrows
Recommended Held Items: Scope Lens, Wise Glasses, Focus Band
Recommended Battle Item: Eject Button
Dragapult
- Role: Speedster
- Best Lane: Jungle
- Win Rate (Master, Past 2 Weeks): 52.5%
- Pick Rate: 15.9%
- Difficulty: Hard
Dragapult currently sits at the top of the meta for one clear reason: its Phantom Force allows it to assassinate key targets while untargetable. Its early-game laning phase is weak, with a power spike at level 9 when it gains access to Phantom Force. In teamfights, it functions as an assassin, excelling at diving backlines and eliminating carries.
Key Matchups:
- Wins against: Gardevoir, Clefable, Can eliminate squishy backliners before they can react
- Struggles against: Blaziken, Mewtwo (Y), Can be outdueled by other strong 1v1 fighters
Recommended Held Items: Scope Lens, Focus Band, Muscle Band
Recommended Battle Item: X Speed
A-Tier Pokémon – In-Depth Analysis
Gardevoir
- Role: Attacker
- Best Lane: Bottom
- Win Rate (Master, Past 2 Weeks): 51.9%
- Pick Rate: 18.3%
- Difficulty: Medium
Gardevoir is a consistent threat in the current meta due to its ability to control space with Psychic and burst targets with Future Sight. Its early-game laning phase is average, with a power spike at level 7 when it gains access to Psychic. In teamfights, it functions as a zone controller, excelling at creating no-go areas for enemies.
Key Matchups:
- Wins against: Blastoise, Snorlax, Can kite and deal massive damage to slow defenders
- Struggles against: Dragapult, Zeraora, Fast attackers that can close the gap before Psychic activates
Recommended Held Items: Wise Glasses, Focus Band, Shell Bell
Recommended Battle Item: Eject Button
Leafeon
- Role: Speedster
- Best Lane: Jungle
- Win Rate (Master, Past 2 Weeks): 51.6%
- Pick Rate: 14.7%
- Difficulty: Medium
Leafeon remains strong in the current meta due to its exceptional objective control and burst damage. Its early-game laning phase is strong, with a power spike at level 5 when it gains access to Leaf Blade. In teamfights, it functions as an objective-focused fighter, excelling at securing Rayquaza and other major objectives.
Key Matchups:
- Wins against: Mewtwo (X), Eldegoss, Can burst down targets before they can react
- Struggles against: Blaziken, Snorlax, Tanky fighters that can survive its burst and out-sustain it
Recommended Held Items: Muscle Band, Focus Band, Scope Lens
Recommended Battle Item: X Attack
Blastoise
- Role: Defender
- Best Lane: Top
- Win Rate (Master, Past 2 Weeks): 51.3%
- Pick Rate: 13.2%
- Difficulty: Easy
Blastoise has risen in the current meta due to its improved survivability with the Shell Shield buff. Its early-game laning phase is strong, with a power spike at level 7 when it gains access to Hydro Pump. In teamfights, it functions as a frontline anchor, excelling at initiating fights and absorbing damage.
Key Matchups:
- Wins against: Zeraora, Dragapult, Can tank their burst and retaliate with Hydro Pump
- Struggles against: Decidueye, Gardevoir, Can be worn down by sustained ranged damage
Recommended Held Items: Buddy Barrier, Focus Band, Rocky Helmet
Recommended Battle Item: Eject Button
Lapras
- Role: Defender
- Best Lane: Top
- Win Rate (Master, Past 2 Weeks): 50.9%
- Pick Rate: 12.8%
- Difficulty: Easy
Lapras remains a solid pick in the current meta due to its ability to control areas with Ice Beam and sustain with Ice Floe. Its early-game laning phase is average, with a power spike at level 7 when it gains access to Ice Beam. In teamfights, it functions as a zone controller, excelling at locking down key areas and protecting objectives.
Key Matchups:
- Wins against: Leafeon, Zeraora, Can immobilize fast attackers and prevent escapes
- Struggles against: Blaziken, Mewtwo (Y), Can be overwhelmed by high-burst fighters
Recommended Held Items: Buddy Barrier, Focus Band, Shell Bell
Recommended Battle Item: Eject Button
Comfey
- Role: Supporter
- Best Lane: Bottom
- Win Rate (Master, Past 2 Weeks): 50.7%
- Pick Rate: 14.1%
- Difficulty: Medium
Comfey is a reliable support in the current meta due to its ability to enable aggressive plays with Floral Healing. Its early-game laning phase is strong, with a power spike at level 7 when it gains access to Floral Healing. In teamfights, it functions as an aggressive enabler, excelling at keeping allies alive during aggressive pushes.
Key Matchups:
- Wins against: Blaziken, Leafeon, Can keep allies alive through their burst damage
- Struggles against: Dragapult, Mewtwo (Y), Can be targeted directly by assassins
Recommended Held Items: Buddy Barrier, Focus Band, Exp. Share
Recommended Battle Item: Eject Button
B-Tier Pokémon, In-Depth Analysis
Charizard
- Role: All-Rounder
- Best Lane: Top
- Win Rate (Master, Past 2 Weeks): 50.2%
- Pick Rate: 11.4%
- Difficulty: Easy
Charizard is a solid but conditional pick in the current meta due to its strong area damage but predictable patterns. Its early-game laning phase is average, with a power spike at level 9 when it gains access to Seismic Slam. In teamfights, it functions as an area damage dealer, excelling at controlling teamfight spaces with fire moves.
Niche Use Case: Excels in team compositions that can set up enemies for Seismic Slam, particularly with hard crowd control from defenders like Blastoise.
Key Matchups:
- Wins against: Snorlax, Eldegoss, Can deal massive area damage to grouped enemies
- Struggles against: Dragapult, Zeraora, Mobile threats that can easily dodge its predictable attacks
Recommended Held Items: Focus Band, Muscle Band, Shell Bell
Recommended Battle Item: Full Heal
Pikachu
- Role: Attacker
- Best Lane: Bottom
- Win Rate (Master, Past 2 Weeks): 49.8%
- Pick Rate: 10.6%
- Difficulty: Easy
Pikachu is a reliable but outclassed attacker in the current meta due to its consistent damage but lack of burst compared to higher-tier options. Its early-game laning phase is strong, with a power spike at level 7 when it gains access to Thunderbolt. In teamfights, it functions as a consistent damage dealer, excelling at chipping down enemies over time.
Niche Use Case: Strong in beginner to intermediate ranks where its simplicity and consistency are valuable assets.
Key Matchups:
- Wins against: Snorlax, Blastoise, Can chip down defenders safely from range
- Struggles against: Dragapult, Mewtwo (Y), Can be outbursted by higher-tier damage dealers
Recommended Held Items: Wise Glasses, Focus Band, Shell Bell
Recommended Battle Item: Eject Button
Zeraora
- Role: Speedster
- Best Lane: Jungle
- Win Rate (Master, Past 2 Weeks): 49.5%
- Pick Rate: 9.8%
- Difficulty: Hard
Zeraora is a high-skill cap option in the current meta due to its reliance on snowballing early to remain effective. Its early-game laning phase is strong, with a power spike at level 5 when it gains access to Wild Charge. In teamfights, it functions as an early-game snowballer, excelling at building early advantages and maintaining them.
Niche Use Case: Exceptional in the hands of skilled players who can consistently secure early kills and maintain momentum throughout the game.
Key Matchups:
- Wins against: Gardevoir, Decidueye, Can close the gap and eliminate squishy targets
- Struggles against: Blaziken, Mewtwo (Y), Can be outdueled by other strong fighters if behind
Recommended Held Items: Muscle Band, Focus Band, Scope Lens
Recommended Battle Item: X Speed
Snorlax
- Role: Defender
- Best Lane: Top
- Win Rate (Master, Past 2 Weeks): 49.2%
- Pick Rate: 8.7%
- Difficulty: Easy
Snorlax is a situational defender in the current meta due to its strong disruption but lack of damage compared to other defenders. Its early-game laning phase is strong, with a power spike at level 7 when it gains access to Heavy Slam. In teamfights, it functions as a disruptor, excelling at breaking enemy formations with Yawn and Heavy Slam.
Niche Use Case: Valuable in compositions that need additional crowd control to set up burst damage from allies.
Key Matchups:
- Wins against: Gardevoir, Decidueye, Can disrupt their positioning and prevent sustained damage
- Struggles against: Blaziken, Mewtwo (Y), Can be ignored or outdamaged by strong fighters
Recommended Held Items: Buddy Barrier, Focus Band, Rocky Helmet
Recommended Battle Item: Eject Button
Eldegoss
- Role: Supporter
- Best Lane: Bottom
- Win Rate (Master, Past 2 Weeks): 48.9%
- Pick Rate: 7.5%
- Difficulty: Easy
Eldegoss is a basic but effective support in the current meta due to its consistent healing and speed boost. Its early-game laning phase is average, with a power spike at level 7 when it gains access to Cotton Spore. In teamfights, it functions as a sustain provider, excelling at keeping teammates alive and mobile.
Niche Use Case: Strong in compositions that need to maintain high mobility and sustained fighting capability.
Key Matchups:
- Wins against: Zeraora, Leafeon, Can heal through their burst and enable escapes with Cotton Spore
- Struggles against: Dragapult, Mewtwo (Y), Can be eliminated before providing meaningful support
Recommended Held Items: Buddy Barrier, Focus Band, Exp. Share
Recommended Battle Item: Eject Button
C-Tier & D-Tier – Off-Meta Spotlights
The Pokémon in these tiers are not recommended for ranked climbing in the current meta. However, writing them off entirely ignores the reality that dedicated mains can, and do – make off-meta picks work.
Each entry below includes what’s holding the Pokémon back and the specific (if narrow) conditions where it can still contribute.
Wigglytuff
- Why it’s struggling: Low healing output compared to other supports and predictable crowd control that’s easily avoided
- Where it can still work: In compositions that need additional engage tools and can capitalize on Double Slap setups
- Win rate context: At 47.3%, this is 3.2 points below the roster average of 50.5%
Gengar
- Why it’s struggling: Recent nerfs to base attack and Hex cooldown have severely impacted its early-game pressure and burst potential
- Where it can still work: As a counter-pick to immobile backliners in compositions that can protect Gengar during its weak early game
- Win rate context: At 46.8%, this is 3.7 points below the roster average of 50.5%
Sylveon
- Why it’s struggling: Outclassed by other attackers in both burst and sustained damage, with a less reliable crowd control option
- Where it can still work: In extended teamfights where its Mystical Fire damage reduction can be maximized
- Win rate context: At 47.1%, this is 3.4 points below the roster average of 50.5%
Machamp
- Why it’s struggling: Low damage output compared to other All-Rounders and predictable engage patterns that are easily countered
- Where it can still work: In low-rank games where enemies don’t respect its Seismic Toss range and positioning
- Win rate context: At 45.9%, this is 4.6 points below the roster average of 50.5%
Cramorant
- Why it’s struggling: Inconsistent damage output and vulnerable during Dive animation, making it unreliable in coordinated play
- Where it can still work: As a surprise pick against teams without mobility to escape its Dive+Surf combo
- Win rate context: At 45.2%, this is 5.3 points below the roster average of 50.5%
Solo Queue vs. 5-Stack: Tier List Splits That Actually Matter
I climbed from Veteran to Master 1600 across two seasons. The first time, I did it almost entirely in solo queue. The second time, I had a consistent trio. The Pokémon I trusted in each environment were not the same.
Here is why that matters: a Pokémon like Comfey can be a game-warping force in coordinated play where your lane partner knows exactly when to engage. In solo queue, where your lane partner may not even show up to the first objective, that same Comfey pick is a prayer, and prayers don’t climb.
The tables below reflect how Pokémon shift in value depending on your queue environment. This is not theoretical. It is based on win rate differentials between solo queue and team queue data where available, combined with the mechanical realities of each Pokémon’s kit.
Best Pokémon for Solo Queue Ranked
Solo queue demands self-sufficiency. You need Pokémon that can secure objectives without help, escape bad engagements, and function when your team composition makes no sense. These Pokémon have the tools to carry regardless of what the other four players on your team are doing.
| Pokémon | Tier (Solo) | Why It Works in Solo Queue |
|---|---|---|
| Mewtwo (Y) | S | High burst damage secures Rayquaza without team coordination; can delete key targets independently |
| Blaziken | S | Built-in lifesteal lets it survive and escape bad engagements; strong 1v1 potential |
| Dragapult | S | Mobility tools escape collapsed engages; can assassinate key targets without setup |
| Decidueye | A | Consistent damage output doesn’t rely on teammates; can stack damage on objectives alone |
| Lapras | A | Self-sufficient zone control can protect objectives alone; sustain keeps it alive in 1v2 situations |
Best Pokémon for Coordinated 5-Stack Teams
In a 5-stack, the equation flips. Pokémon that enable teammates, set up wombo combos, or fill specific role-player functions gain enormous value. A coordinated team can protect a fragile hypercarry, chain crowd control, and rotate to objectives as a unit, unlocking potential that solo queue chaos suppresses.
| Pokémon | Tier (5-Stack) | Why It Works in Coordinated Play |
|---|---|---|
| Clefable | S | Healing output scales with teammate positioning, predictable in comms; can keep hypercarries alive through focus |
| Comfey | S | Floral Healing enables aggressive plays when teammates coordinate engages; can turn fights with timely heals |
| Blastoise | S | Setup crowd control chains into teammate burst reliably; can initiate fights on command |
| Eldegoss | A | Speed boost enables coordinated rotations and repositioning; can keep mobile teammates in optimal positions |
| Snorlax | A | Disruption tools create openings for coordinated team attacks; can set up guaranteed hits for skillshot-dependent allies |
Pokémon That Play Differently in Solo vs. Teams
| Pokémon | Solo Queue Tier | 5-Stack Tier | Why the Split Exists |
|---|---|---|---|
| Comfey | B | S | Healing output is wasted without coordination; in solo queue, teammates rarely position to maximize Floral Healing |
| Eldegoss | C | A | Speed boost and healing require coordination to be effective; in solo queue, these tools are often underutilized |
| Snorlax | C | A | Disruption tools require follow-up from teammates; in solo queue, Yawn and Heavy Slam often go unpunished |
| Dragapult | S | A | Assassin playstyle is more effective in chaotic solo queue; in coordinated play, teams can protect against dives |
| Mewtwo (Y) | S | A | Burst damage is more valuable when teams are uncoordinated; in 5-stacks, teams can focus and protect against Mewtwo |
Counter-Pick Reference: What to Pick Against Every Top-Tier Threat
The enemy team locks in a Pokémon that has been terrorizing ranked all week. You have one pick to answer it. This section exists for that moment.
Every counter-pick below is chosen based on matchup mechanics, specific ability interactions, range advantages, or role counters, not general “this Pokémon is good” logic. A counter-pick is not just a strong Pokémon. It is the right Pokémon for that specific problem.
S-Tier Counters
| Opponent’s Pick | Your Best Counter | Why It Works |
|---|---|---|
| Mewtwo (Y) | Dragapult | Can dive Mewtwo during Psychic cast, interrupting the ability and eliminating it before it can react |
| Blaziken | Lapras | Ice Beam can immobilize Blaziken during Brave Bird, preventing the healing and leaving it vulnerable |
| Clefable | Gardevoir | Long range allows Gardevoir to pressure Clefable without entering Moonlight healing range |
| Decidueye | Blastoise | Shell Shield reduces Nock Nock damage significantly, allowing Blastoise to engage on Decidueye safely |
| Dragapult | Mewtwo (X) | Future Sight can hit Dragapult during Phantom Force, revealing its position and chunking its health |
A-Tier Counters
| Opponent’s Pick | Your Best Counter | Why It Works |
|---|---|---|
| Gardevoir | Zeraora | Extreme mobility allows Zeraora to close the gap before Psychic can zone it out |
| Leafeon | Blaziken | Can outduel Leafeon in 1v1 situations with superior sustain and burst damage |
| Blastoise | Decidueye | Can stack massive damage on immobile Blastoise during Hydro Pump cast animation |
| Lapras | Pikachu | Can chip down Lapras safely from range, avoiding Ice Beam range while wearing down its sustain |
| Comfey | Dragapult | Can eliminate Comfary before it can provide meaningful healing to its team |
How to Counter-Pick in 30 Seconds
- Identify the biggest threat. Look at the enemy team. Which Pokémon is most likely to carry? That’s your counter-pick target, not the support, not the defender anchoring their backline.
- Check the counter-pick table above. Find the threat and lock in the recommended counter if it fits your role.
- If the hard counter isn’t available (banned, picked, or outside your role pool), look for a soft counter: a Pokémon with range advantage, a crowd control tool that interrupts their core ability, or a role that naturally pressures their lane.
- Don’t counter-pick yourself. Picking a Pokémon you have never played because the chart says so is worse than picking a comfortable A-tier into a bad matchup. Counter-picking only works if you can pilot the counter.
Best Duo & Trio Queue Synergies
Queuing with a friend or two changes what’s possible. A well-built duo lane can dominate from the first minute. A coordinated trio can control the jungle, secure every objective, and decide teamfights before they start.
Best Duo Lane Pairings
| Pokémon 1 | Pokémon 2 | Best Lane | Why It Works |
|---|---|---|---|
| Clefable | Decidueye | Bottom | Clefable’s healing allows Decidueye to stand still and stack Nock Nock damage without worrying about survivability |
| Blastoise | Gardevoir | Bottom | Blastoise’s Surf can set up guaranteed Psychic hits, while Gardevoir’s range covers Blastoise’s approach |
| Comfey | Blaziken | Top | Floral Healing enables Blaziken’s aggressive Brave Bird plays without risking death |
| Lapras | Pikachu | Top | Lapras’s Ice Beam immobilizes targets for Pikachu’s fully charged Thunderbolts |
| Snorlax | Mewtwo (Y) | Bottom | Yawn sets up guaranteed Psychic hits, while Mewtwo’s burst eliminates targets after Heavy Slam |
Best Trio Queue Team Cores
| Pokémon 1 (Jungle) | Pokémon 2 (Top) | Pokémon 3 (Bottom) | Core Strategy |
|---|---|---|---|
| Dragapult | Blastoise | Clefable | Blastoise initiates with Surf, Clefable keeps Dragapult alive during dives, enabling consistent assassinations |
| Mewtwo (Y) | Lapras | Decidueye | Lapras zones with Ice Beam, Decidueye stacks damage on immobilized targets, Mewtwo cleans up with burst |
| Leafeon | Snorlax | Comfey | Snorlax disrupts with Yawn, Comfey heals Leafeon during extended fights, enabling consistent objective control |
Wombo Combo Pairings
These are ultimate-ability synergies that, when executed together, can wipe an entire enemy team.
| Pokémon 1 (Setup) | Pokémon 2 (Follow-Up) | Combo Description |
|---|---|---|
| Blastoise | Gardevoir | Blastoise’s Hydro Spin pulls enemies together, setting up a perfect centered Psychic for maximum damage |
| Snorlax | Mewtwo (Y) | Yawn puts multiple enemies to sleep, allowing Mewtwo to line up a perfect Psystrike hitting multiple targets |
| Lapras | Decidueye | Ice Beam freezes key targets, allowing Decidueye to stack maximum Nock Nock arrows on immobile enemies |
| Clefable | Blaziken | Gravity grounds enemies, preventing escapes from Blaziken’s Unite Move range, ensuring maximum hits |
Tier List by Role: Best Picks for Every Position
Sometimes you don’t need the best Pokémon overall, you need the best Attacker because that’s the role your team is missing. Here is every role, ranked.
Best Attackers
| Tier | Pokémon | Why |
|---|---|---|
| S | Decidueye | Exceptional sustained damage and objective control with Nock Nock |
| A | Gardevoir | Strong zone control and burst damage with Psychic and Future Sight |
| A | Chien-Pao | High snowball potential and burst damage with Sword of Ruin |
| B | Pikachu | Consistent damage output and reliable stun with Thunderbolt |
| B | Sylveon | Decent damage reduction with Mystical Fire but outclassed by other attackers |
| C | Cramorant | Inconsistent damage output and vulnerable during Dive animation |
Best Speedsters
| Tier | Pokémon | Why |
|---|---|---|
| S | Dragapult | Unstoppable assassin with Phantom Force and high burst damage |
| A | Leafeon | Exceptional objective control and burst damage with Leaf Blade |
| B | Zeraora | High skill cap snowballer with Wild Charge but inconsistent in current meta |
| C | Gengar | Severely weakened by recent nerfs to Hex and base attack |
| C | Talonflame | Outclassed by other speedsters in damage and utility |
Best All-Rounders
| Tier | Pokémon | Why |
|---|---|---|
| S | Mewtwo (Y) | Top-tier burst damage and assassination potential with Psychic |
| S | Blaziken | Exceptional sustain and teamfight impact with Brave Bird and Unite Move |
| B | Charizard | Strong area damage but predictable patterns and low mobility |
| D | Machamp | Low damage output and predictable engage patterns |
| D | Lucario | Outclassed by other All-Rounders in damage and utility |
Best Defenders
| Tier | Pokémon | Why |
|---|---|---|
| A | Blastoise | Improved survivability with Shell Shield buff and strong initiate with Surf |
| A | Lapras | Excellent zone control with Ice Beam and sustain with Ice Floe |
| B | Snorlax | Strong disruption with Yawn and Heavy Slam but lacks damage |
| C | Crustle | Predictable engage with Shell Smash and low teamfight impact |
| C | Greedent | Weak teamfight presence despite strong farming capabilities |
Best Supporters
| Tier | Pokémon | Why |
|---|---|---|
| S | Clefable | Consistent healing output with Moonlight that outpaces all other supports |
| A | Comfey | Strong aggressive enablement with Floral Healing but requires coordination |
| B | Eldegoss | Reliable healing and speed boost but outclassed by other supports in impact |
| C | Wigglytuff | Low healing output and predictable crowd control |
| C | Hoopa | Niche utility with Hyperspace Hole but inconsistent in standard play |
New Player Roadmap: Which Pokémon to Buy First
Aeos Coins are slow to earn. Your first few purchases shape your entire early experience with Pokemon Unite, and picking wrong can mean weeks of grinding with a Pokémon you regret. Here is a purchase sequence designed to give you a flexible, competitive roster with minimal wasted currency.
Step 1: Best First Purchase (Under 6,000 Aeos Coins)
Your first purchase should be a Pokémon that is:
- Easy to learn (low skill floor)
- Effective in solo queue (self-sufficient)
- Role-flexible or a strong representative of a core role
- Cheap enough to leave you coins for a second purchase soon after
| Pokémon | Cost | Role | Why It’s a Safe First Buy |
|---|---|---|---|
| Pikachu | 4,000 | Attacker | Simple ranged gameplay, consistent damage, effective at all ranks, and teaches fundamental positioning |
| Blastoise | 6,000 | Defender | Tanky and forgiving, teaches when to engage and disengage, strong in all team compositions |
| Snorlax | 4,000 | Defender | Extremely tanky, simple ability usage, teaches basic crowd control timing |
Step 2: Best Second Purchase (6,000–10,000 Coins)
Once you have one comfortable pick, expand into a different role. This gives you roster flexibility when your main role is taken and introduces you to a new playstyle.
| Pokémon | Cost | Role | Why It Complements Your First Pick |
|---|---|---|---|
| Blaziken | 8,000 | All-Rounder | Covers a more aggressive playstyle, different damage type (physical), strong in 1v1 situations |
| Gardevoir | 8,000 | Attacker | Covers a different damage range and playstyle, teaches zone control and positioning |
| Leafeon | 10,000 | Speedster | Introduces jungle role, teaches objective control and map awareness |
Step 3: Pokémon to Avoid Buying Early
Some Pokémon look appealing, flashy kits, dominant in tournaments, recommended by your favorite streamer, but are traps for new players. They require game knowledge, mechanical precision, or team coordination that beginners simply don’t have yet.
| Pokémon | Why to Wait |
|---|---|
| Mewtwo (Y) | Extremely fragile; one positioning mistake means death and there’s no teammate in beginner lobbies who will peel for you |
| Dragapult | High skill cap with Phantom Force timing; requires game knowledge to identify priority targets |
| Gengar | Severely punished by positioning mistakes; weak early game requires advanced knowledge to survive |
| Clefable | Relies on teammates following up on healing; in low ranks, your healing is often wasted |
Step 4: Use Free Rotation Before You Commit
Pokemon Unite offers a weekly free rotation of Pokémon available in Standard and Quick matches. Before spending coins on any Pokémon in this guide, play it in the free rotation for at least 5-10 matches. A tier list can tell you what’s strong, but only your hands can tell you what’s fun.
Current free rotation Pokémon (week of May 15, 2024): Charizard, Gardevoir, Eldegoss, Zeraora, Crustle, Wigglytuff, Talonflame
How We Determine Our Tier List Rankings
Transparency matters. Every tier list on this page reflects a combination of data sources, not a single person’s gut feeling or the echo of whatever Reddit is mad about this week.
Win Rate & Pick Rate Data Sources
Primary statistics are drawn from UniteAPI, which aggregates match data from a large sample of ranked games. We weight Master-rank data most heavily (typically the past two weeks of matches), as this represents the competitive playerbase most relevant to meta analysis. Win rates below 48% or above 54% are flagged as statistically significant deviations from the roster average.
Competitive Meta Analysis
Tournament results from the Pokemon Unite Championship Series and major regional events inform tier placements for coordinated play. A Pokémon with low solo queue win rates but high tournament presence may receive a split ranking (see Solo Queue vs. 5-Stack section above). Tournament data is sourced from official broadcast VODs, Liquipedia match logs, and community tournament organizers.
Community Consensus & Patch Impact
Balance patches are the single largest disruptor of tier list stability. When a patch drops, we:
- Wait 48-72 hours for win rate data to stabilize
- Cross-reference statistical shifts with community sentiment on r/PokemonUnite and major Discord servers
- Test high-impact changes in-game where possible
- Update tier placements only when data and practice align, not on day one of a patch based on theorycrafting alone
Update Cadence
This page is reviewed and updated:
- Within 72 hours of any balance patch
- Within 1 week of a new Pokémon release
- Biweekly during stable meta periods to confirm no drift in rankings
- Immediately if a game-breaking bug or emergency hotfix shifts the competitive landscape
The “Last Updated” date at the top of this page reflects the most recent substantive change to tier placements or analysis. Minor copy edits are not treated as updates.
Frequently Asked Questions
What is the best Pokémon in Pokemon Unite right now?
As of Patch 1.13.1.4 (May 2024), the strongest overall Pokémon in the current meta is Mewtwo (Y). It holds a 54.2% win rate in Master-rank lobbies with a 22.8% pick rate (source: UniteAPI), indicating both high performance and broad adoption. However, “best” is context-dependent, the best Pokémon for solo queue may differ from the best for coordinated play (see the Solo Queue vs. 5-Stack section above).
How often does the Pokemon Unite tier list change?
Significant tier list changes typically occur with each balance patch, which TiMi Studio Group releases approximately every 3-4 weeks. New Pokémon releases also shift the meta, usually within the first 1-2 weeks as players optimize builds. Between patches, the meta is relatively stable, though occasional counter-meta developments can cause gradual shifts. This page is updated within 72 hours of any patch.
Is Mewtwo (Y) worth buying?
At 10,000 Aeos Coins, Mewtwo (Y) is worth buying for experienced players but risky for beginners for the following reasons: It has the highest win rate in the game and exceptional carry potential, but its fragility requires good positioning knowledge that new players typically lack. If you’re still learning the game’s fundamentals, consider mastering a more forgiving Pokémon first.
What’s the best role to climb solo queue?
Historically, jungle (central area) carries, typically Speedsters and certain All-Rounders, have the highest agency in solo queue. They control the pace of the game, influence all three lanes, and are best-positioned to secure objectives independently. However, the current meta favors All-Rounders and Attackers due to the importance of burst damage in the current teamfight meta. See the Solo Queue section above for specific Pokémon recommendations.
Are Defender and Supporter Pokémon viable in low rank?
Yes, but with a caveat. Defenders and Supporters are viable at every rank, but in lower ranks (Beginner through Veteran), their impact depends heavily on whether teammates capitalize on the opportunities they create. A Defender that sets up a perfect engagement means nothing if no one follows up. In these ranks, consider Defenders with strong independent damage (like Blastoise ) or Supporters who can also secure kills (like Clefable ) rather than purely team-dependent picks.
How do I use the tier list maker tool?
The interactive tool embedded above lets you create a custom Pokemon Unite tier list by dragging and dropping Pokémon icons into your preferred tiers. Click any Pokémon to move it, rename tier labels by double-clicking them, and use the “Share” button to generate a link you can send to friends or post online. No account is required, and no personal data is stored.
Disclaimer
Tier List Maker is an independent site and is not affiliated with, endorsed by, or connected to The Pokémon Company, Nintendo, TiMi Studio Group, or any official Pokemon Unite entity. All Pokémon names, images, and related trademarks are the property of their respective owners. Tier list data is sourced from publicly available statistics and community resources including UniteAPI. Tier placements reflect analysis and community consensus as of the “Last Updated” date and should be treated as guidance, not objective fact. The meta evolves, your mileage may vary.
For questions, corrections, or tier list disputes, contact: tierlistmaker1214@gmail.com
Conclusion
A tier list is only as useful as the decision it helps you make.
This page exists to answer the specific questions that generic tier lists leave hanging: What do I pick against a Mewtwo? Does this ranking even apply to solo queue? Who should I duo with? What should I spend my first 6,000 coins on?
Here are your actionable takeaways:
- If you have 5 seconds: Scroll to the Quick-Look Tier List. Lock in an S-tier or A-tier Pokémon.
- If the enemy picked a meta threat: Use the Counter-Pick Reference. Pick the counter if you can play it.
- If you’re queuing alone: Trust the Solo Queue table. Pick self-sufficient carries.
- If you’re queuing with friends: Check the Duo/Trio Synergies section. Coordinate your lane pairing.
- If you disagree with our rankings: Use the Tier List Maker. Build your own. Share it. The argument is part of the game.
The meta will shift. Patches will drop. New Pokémon will arrive and old ones will return to relevance. But the framework here, data-backed rankings, context-specific splits, and the tools to form your own conclusions, stays consistent.
Build your list. Trust your practice. Queue up. also checkout Pokemon Starters Tier List
![Marvel_Rivals_Smash_Or_Pass_Tier_List[1]](https://tier-list-maker.com/wp-content/uploads/2025/02/Marvel_Rivals_Smash_Or_Pass_Tier_List1-1.webp "Marvel Rivals Smash Or Pass Tier List Maker | The best Marvel Rivals Smash Or Pass 2026 5")